Posts

Showing posts from February, 2020

ISE - Wired - Machine and User authentication

Image
In wired NIC Authentication tab, click Additional Settings > Specify Authentication mode Computer authentication   --- only computer account is sent to ISE User authentication           --- only user account is sent to ISE  User or Computer authentication  --- when PC boot up or switch port comes up, machine authentication starts first,  with successful machine authentication, machine Authorization profile applies;  after user login, user authentication starts, with successful user authentication, the new user Authorization profile applies.  Computer Dot1X authentication only occurs when the computer boot up and when the user logout, shut /no shut switch port doesn't trigger computer to redo Dot1X authentication, only computer MAB and user dot1x occur. A Common session ID is created after computer authentication, successful user authentication is using the same session ID, on ISE, this is Audit Session ID. MAR. PEAP doesn't allow for the user AND computer to aut
ISE - Wired dACL and pACL

1. Switch  port is configured at Low Impact mode, interface ACL PRE-AUTH is configured Extended IP access list PRE-AUTH     10 permit udp any any eq ntp     20 permit udp any eq bootpc any eq bootps (71 matches)     30 permit udp any any eq domain     40 permit icmp any any     50 permit udp any any eq tftp     60 deny ip any any interface FastEthernet1/0/3  description Desktop  switchport access vlan 7  switchport mode access  switchport voice vlan 9   ip access-group PRE-AUTH in  authentication host-mode multi-auth  authentication open  authentication order mab dot1x  authentication priority dot1x mab  authentication port-control auto  mab  snmp trap mac-notification change added  dot1x pae authenticator  spanning-tree portfast end 2. ISE is configured dACL EMPLOYEE_ACL remark Denies access to MGMT subnet deny ip any 192.168.2.0 0.0.0.255 remark Permit Internet and Corporate Access permit ip any any 3. When an user successfully authenticated with 80

Checkpoint Cluster setup

Image
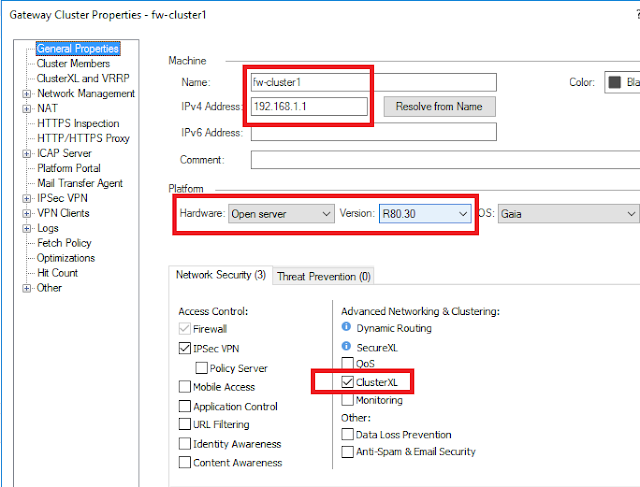
============= ClusterXL HA======== 2 modes: HA                   (active standby) Load sharing / Load Balancing    (active active)  -- unicast or multicast virtual IP address state synchronization -- full vs delta CCP - Cluster control protocol over all interfaces Cluster status: active standby down active attention ready initializing ClusterXL inactive or machine is down 1. During the GW installation, choose ClusterXL as cluster type 2. After both GW are installed, in SmartConsole, add a new cluster 3.  Add cluster member 4. Both GW are added 5. Configure cluster 6. Create cluster IP for each data interface. 7. Create HA interface on both GW.  8. Re-fetch network interfaces with topology 9. Review and adjust log setting. 10. Cluster status are red, after install policy will be turned to green. --------------------------- Check HA status old command: cphaprob [state] gw-3> show cluster state Cluster Mode:   High Availability (Active Up) with IGMP Membership ID         Unique Address

Checkpoint Notes

Image
1. use SCP to transfer file It is recommended to add a new user with "scponly" shell, instead of changing admin user to "bash" shell 2. Reset SIC In case SIC has issue or policy deployment causes connection loss to GW, reset SIC will load initial policy. on GW: cpconfig , choose 5, set one time activation key,  then choose 10.  On SMS: firewall properties > General Properties > [Communication]  3. object used in Firewall Policy If an object has private IP and static NAT. The firewall policy use the object for inbound and outbound rule, no need specify its private or public IP.  4. Inline Policy regular rule can only select service (port), after Action uses Inline Layer, the subrule can use application and URL. 5. Backup  /var/log/CPbackup/backups/ system backup:    GUI, backup Gaia config.    CLI: add backup / set backup restore 6. Ping Global Properties > Accept ICMP requests implied rule "before last" literally means, before the last explicit ru

Checkpoint Quick Start and Architecture

CP quick start VM: 1.Create a VM OS Other version Other 64-bit, SMS:8G RAM, GW:4G RAM, 2 CPU, 50G HDD. 2.Boot with ISO image. 3.Initial setup includes assigning IP address (eth0, management) and admin credential. 4.Once VM installation is completed, reboot to get in Gaia GUI, with First Time Configuration Wizard, Select to install SMS or/and GW on this vm 5.After Gaia installation, reboot and login Gaia GUI again to configure system level info like Internet interface and routing. Appliance: 1. -initial setup - connect PC to MGMT port 2. Assign PC an IP 192.168.1.2 3. Launch Gaia web https://192.168.1.1 4. Default account: admin/admin 5. First Time Configuration Wizard to configure IP, admin credential, select to install SMS or/and GW on this appliance 6. 5.After Gaia installation, reboot and login Gaia GUI again to configure system level info like interface and routing. Login SMS Gaia GUI to download SmartConsole to your PC 1. In SmartConsole, Add new GW, use the one t

SRX logs

1. VPN log # set system syslog file kmd-logs daemon info # set system syslog file kmd-logs match KMD >show log kmd-logs

SRX VPN TS1

1. Show p1 sa root> show security ike sa Index   State  Initiator cookie  Responder cookie  Mode           Remote Address 140251  UP      0ae9859f01bd1b30  63df09b48848d960  IKEv2          203.0.113.1 root> root> show security ike sa  203.0.113.1  detail IKE peer 203.0.113.1, Index 140251, Gateway Name: ASA   Role: Initiator, State: UP   Initiator cookie: 0ae9859f01bd1b30, Responder cookie: 63df09b48848d960   Exchange type: IKEv2, Authentication method: Pre-shared-keys   Local: 203.0.113.2:500, Remote: 203.0.113.1:500   Lifetime: Expires in 17712 seconds   Peer ike-id: 203.0.113.1   Xauth assigned IP: 0.0.0.0   Algorithms:    Authentication        : hmac-sha256-128    Encryption            : aes256-cbc    Pseudo random function: hmac-sha256    Diffie-Hellman group  : DH-group-14   Traffic statistics:    Input  bytes  :               549136    Output bytes  :               549040    Input  packets:                 6848    Output packets:               

SRX IKEv2 routed L2L VPN

Image
1. Create tunnel interface, IP address is optional set interfaces st0 unit 0 family inet 2. Assign the tunnle interface to VPN zone,  set security zones security-zone VPN interfaces st0.0 3. Set routing for remote network set routing-options static route 192.168.1.0/24 next-hop st0.0 4. Enable ike on outside interface set security zones security-zone untrust interfaces ge-0/0/0.0 host-inbound-traffic system-services ik e 5. Create P1 proposal set security ike proposal ASA-P1 authentication-method pre-shared-keys set security ike proposal ASA-P1 dh-group group14 set security ike proposal ASA-P1 authentication-algorithm sha-256 set security ike proposal ASA-P1 encryption-algorithm aes-256-cbc set security ike proposal ASA-P1 lifetime-seconds 86400 6. Create P1 policy, link the P1 proposal, set pre-share key. set security ike policy ASA-P1-POLICY mode main set security ike policy ASA-P1-POLICY proposals ASA-P1 set security ike policy ASA-P1-POLICY pre-shared