Posts

Showing posts from 2014

Backbond fast

Image
Backbone fast is a Cisco proprietary feature that, once enabled on all switches of a bridge network, can save a switch up to 20 seconds (max_age) when it recovers from an indirect link failure. Let's shut down SW1 e0/0 to simulate the link failure. SW1(config)#int e0/0 SW1(config-if)#shut SW1(config-if)# *Dec 29 18:26:01.487: %LINK-5-CHANGED: Interface Ethernet0/0, changed state to administratively down *Dec 29 18:26:02.487: %LINEPROTO-5-UPDOWN: Line protocol on Interface Ethernet0/0, changed state to down SW1(config-if)# SW3(config)# *Dec 29 18:26: 10 .327: STP: VLAN0001 heard root 32769-aabb.cc00.0200 on Et0/0 SW3(config)# *Dec 29 18:26: 12 .323: STP: VLAN0001 heard root 32769-aabb.cc00.0200 on Et0/0 SW3(config)# *Dec 29 18:26: 14 .327: STP: VLAN0001 heard root 32769-aabb.cc00.0200 on Et0/0 SW3(config)# *Dec 29 18:26: 16 .327: STP: VLAN0001 heard root 32769-aabb.cc00.0200 on Et0/0 SW3(config)# *Dec 29 18:26: 18 .327: STP: VLAN0001 heard root 32769-aabb.cc00.0200 on Et0

Uplink Fast

Image
in normal STP operation, SW1 is the root. SW3 e0/0 is in block status. SW3#sh spanning-tree VLAN0001   Spanning tree enabled protocol ieee   Root ID    Priority    32769              Address     aabb.cc00.0100              Cost        100              Port        2 (Ethernet0/1)              Hello Time   2 sec  Max Age 20 sec  Forward Delay 15 sec   Bridge ID  Priority    32769  (priority 32768 sys-id-ext 1)              Address     aabb.cc00.0300              Hello Time   2 sec  Max Age 20 sec  Forward Delay 15 sec              Aging Time 300 Interface           Role Sts Cost      Prio.Nbr Type ------------------- ---- --- --------- -------- -------------------------------- Et0/0               Altn BLK 100       128.1    Shr Et0/1               Root FWD 100       128.2    Shr Enable debug on SW3 and shut down e0/1 port on SW1. SW3#debug spanning-tree events SW3# *Dec 29 15:52: 13 .815: STP: VLAN0001 new root port Et0/0, cost 200 *Dec 29 15:52:13.815: STP: VLAN0001 Et0/0 -&

UDLD

How Unidirectional Link Detection Protocol Works In order to detect the unidirectional links before the forwarding loop is created, Cisco designed and implemented the UDLD protocol. UDLD is a Layer 2 (L2) protocol that works with the Layer 1 (L1) mechanisms to determine the physical status of a link. At Layer 1, auto-negotiation takes care of physical signaling and fault detection. UDLD performs tasks that auto-negotiation cannot perform, such as detecting the identities of neighbors and shutting down misconnected ports. When you enable both auto-negotiation and UDLD, Layer 1 and Layer 2 detections work together to prevent physical and logical unidirectional connections and the malfunctioning of other protocols. UDLD works by exchanging protocol packets between the neighboring devices. In order for UDLD to work, both devices on the link must support UDLD and have it enabled on respective ports. Each switch port configured for UDLD sends UDL

NTP Authnetication

on NTP client router: ntp authentication-key 1 md5 cisco ntp server 2.2.2.2 key 1 source Loopback0 on NTP Server router: ntp authentication-key 1 md5 cisco ntp trusted-key 1 ntp master 3

Redistribution between EIGRP and OSPF

Image
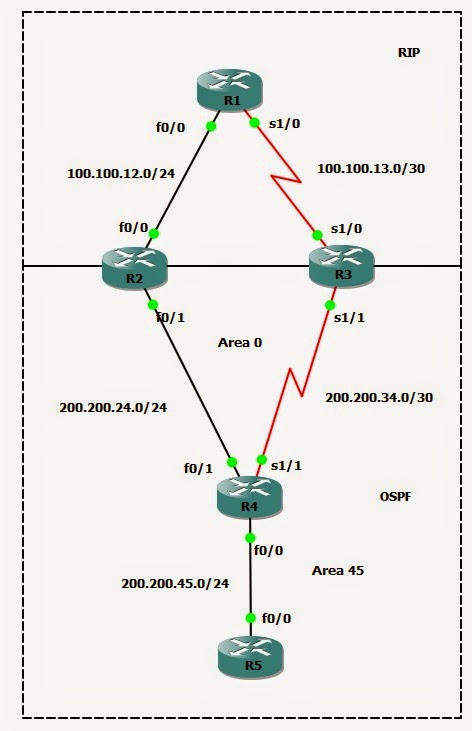
Redistribution between EIGRP and OSPF R2 has all four types OSPF routes: R2#sh ip route ospf      4.0.0.0/32 is subnetted, 1 subnets O       4.4.4.4 [110/11] via 200.200.24.4, 00:04:42, FastEthernet0/1      200.200.34.0/30 is subnetted, 1 subnets O       200.200.34.0 [110/74] via 200.200.24.4, 00:04:42, FastEthernet0/1      55.0.0.0/24 is subnetted, 1 subnets O E1    55.55.55.0 [110/40] via 200.200.24.4, 00:04:42, FastEthernet0/1      5.0.0.0/24 is subnetted, 1 subnets O E2    5.5.5.0 [110/20] via 200.200.24.4, 00:04:42, FastEthernet0/1 O IA 200.200.45.0/24 [110/20] via 200.200.24.4, 00:04:42, FastEthernet0/1 R2#  After redistribute OSPF to EIGRP, R1 has all OSPF routes, all OSPF routes are redistributed into EIGRP and show up as EIGRP EX routes. Metric must be specified. R2(config)#router eigrp 100 R2(config-router)#redistribute ospf 100 metric 100000 100 255 1 1500 R1#sh ip route eigrp      4.0.0.0/32 is subnetted, 1 subnets D EX    4.4.4.4 [170/307200] via 100.100.12.2, 0

Redistribution between RIP and OSPF

Image
Redistribution between RIP and OSPF R2 has all four types OSPF routes: R2#sh ip route ospf      4.0.0.0/32 is subnetted, 1 subnets O       4.4.4.4 [110/11] via 200.200.24.4, 00:04:42, FastEthernet0/1      200.200.34.0/30 is subnetted, 1 subnets O       200.200.34.0 [110/74] via 200.200.24.4, 00:04:42, FastEthernet0/1      55.0.0.0/24 is subnetted, 1 subnets O E1    55.55.55.0 [110/40] via 200.200.24.4, 00:04:42, FastEthernet0/1      5.0.0.0/24 is subnetted, 1 subnets O E2    5.5.5.0 [110/20] via 200.200.24.4, 00:04:42, FastEthernet0/1 O IA 200.200.45.0/24 [110/20] via 200.200.24.4, 00:04:42, FastEthernet0/1 R2# After redistribute OSPF to RIP, R1 has all OSPF routes, so all type OSPF routes are redistributed into RIP by default. R2(config)# router rip R2(config-router)# redistribute ospf 100 metric 5 R2# R1#sh ip route rip      4.0.0.0/32 is subnetted, 1 subnets R       4.4.4.4 [120/5] via 100.100.12.2, 00:00:22, FastEthernet0/0      200.200.34.0/30 is subnetted, 1 subnets R  

Passive interface in RIP

in RIP, when set a interface to passive mode, this will stop the interface from multicasting updates out, but the interface still receive the updates. With passive interface, if use neighbor command, it will start to unicast the updates. So passive interface doesn't really prevent RIP from working on that interface.

SSG session/flow troubleshooting

1. get session info Home-SSG5-> get session src-ip x.x.x.x dst-ip y.y.y.y alloc 11/max 8064, alloc failed 0, mcast alloc 0, di alloc failed 0 total reserved 0, free sessions in shared pool 8053 id 8048/s**,vsys 0,flag 00000040/0080/0021/0000,policy 320002,time 180, dip 0 module 0  if 0(nspflag 800601):192.168.2.173/4471->192.168.2.5/22,6,902b34859902,sess token 4,vlan 0,tun 0,vsd 0,route 1,wsf 0  if 3(nspflag 2002010):192.168.2.173/4471<-192 .168.2.5="" 0="" 5="" br="" route="" sess="" token="" tun="" vlan="" vsd="" wsf="">Total 1 sessions shown Home-SSG5-> 2. Debug flow basic      1)    get ffilter  - see if an filters have been set already, if they have you use 'unset ffilter' to remove, repeat the steps until you remove all the filters     2)    set ffilter src-ip 10.1.1.5 dst-ip 1.1.70.250  - allows you to limit the traffic that you capture

Shrew VPN configuration for routed based Dialup VPN on SSG

Image
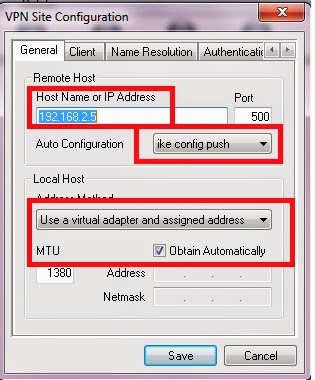
1.General Tab 2. Auth Tab 3. Policy Tab v v v v v v v v

SSG routed based dialup VPN

Image
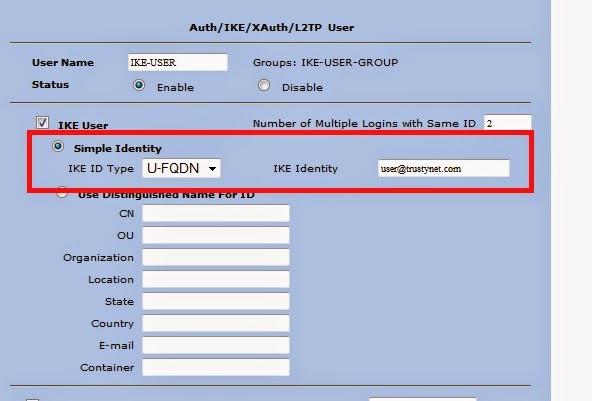
1. Create IKE user   2. Create IKE user group, add above IKE user to the group: 3. Create XAuth users, Select XAuth User, set password. 4. Create the VPN user IP pool, Objects > IP Pools 5. Create an unnumbered tunnel interface: 6. Set default XAuth setting: VPNs > AutoKey Advanced > XAuth Setting 7.1 Create a VPN Gateway 7.2 Set gateway XAuth: VPNs > AutoKey Advanced > Gateway, click XAuth       Check XAuth Server , check Use Default Xauth Settings 8.1 Set Phase2 Parameters: Choose predefined gateway  8.2 Click Advanced, check Bind to Tunnel Interface , check Proxy-ID Check 8.3 Set Proxy-id: VPNs > AutoKey IKE, click Proxy-ID, the Remote should set to 255.255.255.255/32, command line is: set vpn "Dialip VPN" proxy-id local-ip 192.168.3.0/24 remote-ip 255.255.255.255/32 any 9. Create static route to VPN user IP 172.16.0.0/24, next-hop is the tunnel interface 10. Create security policy