 |
===== Backup and Restore method to upgrade ISE to 3.x====
Current Deployment: two ISE nodes
ISE01: Primary Admin Node, Secondary Monitoring Node.
ISE02: Primary Monitoring Node, Secondary Admin Node.
Upgrade steps:
1. Backup ISE configuration and optional operation data.
2. Export Certificates from both nodes (including private keys)
3. Export Running Configuration from both nodes into separate notepad files
4. Disconnect or shutdown ISE02
5. Build a new VM ISE3.x node with the same IP address, hostname, DNS, NTP, Domain Name and all other settings as ISE02 (all details are saved in the notepad file).
6. Restore backup to this new VM, this VM will be in standalone mode.
7. Import certificate and private key, install the patch to this new VM.
8. Make this new VM as Primary PAN/MnT, verify its functionality.
9. Disconnect or Shutdown ISE01
10. Build the 2nd new VM ISE3.x with the same IP address, hostname, DNS, NTP, Domain Name and all other settings as ISE01 (all details are saved in the notepad file)
11. Import certificate and private key, install the latest patch to the 2nd new VM.
12. Join the 2nd new VM to the new deployment as the Secondary PAN.
13. Promote the 2nd new VM as Primary PAN, verify its functionality.
14. Contact Cisco to convert Smart Licenses.
=========================
=========================
Upgrade may take four hours per node.
Disable automatic PAN Failover if it is configured.
Backup from node A then restore it node B is allowed, both will have same hostname but different IP. Don't change node B hostname, otherwise will cause certificate issue.
=======================
=======================
1. GUI
Administration > Maintenance > Patch, click install to upload patch package from local PC
no patch installation progress in GUI, run the following command in CLI to see the patching log
show logging system ade/ADE.log tail | include patch
Patch installation is started from the P-PAN, then S-PAN automatically.
2. CLI
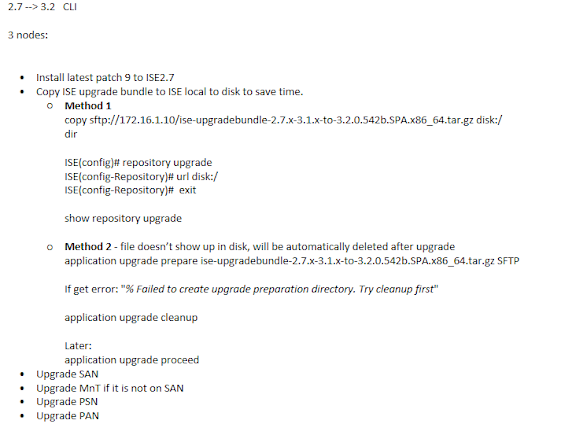
Copy patch package to ISE repository
run command:
Patch install <patch_file_name> <repository_name>
GUI install patch on both ISE automatically (P-PAN, then S-PAN), no installation progress displayed on GUI, can check log:
sh logging system ade/ADE.log tail
CLI only install patch on local ISE.
https://www.cisco.com/c/en/us/support/docs/security/identity-services-engine/215406-patch-installation-on-ise-and-faq-durin.html
=====================================
You can either use Health Check or Upgrade Readiness Tool (URT) to run system diagnosis before upgrade.
URT can detect and fix issues.
URT need be run on the secondary PAN, no downtime to run this tool.
########################Install URT tool###############
Lab:
ISE30-A and IE30B on patch 8
URT bundle is copied to repository called "FTP"
ISE30-B/admin# show repository FTP
ise-patchbundle-3.0.0.458-Patch8-23080321.SPA.x86_64.tar.gz
ise-patchbundle-3.3.0.430-Patch3-24070910.SPA.x86_64.tar.gz
ise-urtbundle-3.3.0.430a-1.0.0.SPA.x86_64.tar.gz
ISE30-B/admin#
ISE30-B/admin# application install ise-urtbundle-3.3.0.430a-1.0.0.SPA.x86_64.tar.gz FTP
Save the current ADE-OS running configuration? (yes/no) [yes] ?
Generating configuration...
Saved the ADE-OS running configuration to startup successfully
Getting bundle to local machine...
Unbundling Application Package...
Verifying Application Signature...
Initiating Application Install...
###########################################
# Installing Upgrade Readiness Tool (URT) #
###########################################
Checking ISE version compatibility
- Successful
Checking ISE persona
- Successful
Along with Administration, other services (MNT,PROFILER,SESSION) are enabled on this node. Installing and running URT might consume additional resources.
Do you want to proceed with installing and running URT now (y/n):y
Checking if URT is recent(<45 days old)
- Note: URT is 347 days old and its version is 1.0.0. There might be a recent URT bundle on CCO, please verify on CCO
Do you want to proceed with this version which is 347 days old (y/n):y
Proceeding with this version of URT itself
Installing URT bundle
We can't re-run URT, have to re-install it:
ISE30-B/admin# show application
<name> <Description>
ise Cisco Identity Services Engine
Patches: 8
urt Cisco ISE - Upgrade Readiness Tool
ISE30-B/admin# application remove urt
Continue with application removal? (y/n) [n] ? y
Application successfully uninstalled
ISE30-B/admin#
-------
Lab Upgrade ISE3.1 P8 to ISE3.3 P4
1. Health Checks passed, and run url if possible
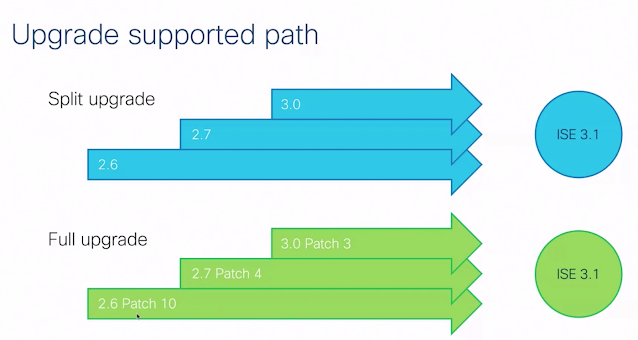
2. Upgrade method
Choose Split Upgrade
Choose Split Upgrade
Seagate is repository name in the lab.
Downloading...
URT 3.3 output on a standalone 3.1 node
ise/admin# application install ise-urtbundle-3.3.0.430a-1.0.0.SPA.x86_64.tar.gz Collector
Save the current ADE-OS running configuration? (yes/no) [yes] ?
Generating configuration...
Saved the ADE-OS running configuration to startup successfully
Getting bundle to local machine...
Unbundling Application Package...
Verifying Application Signature...
Verified OK
Initiating Application Install...
###########################################
# Installing Upgrade Readiness Tool (URT) #
###########################################
Checking ISE version compatibility
- Successful
Checking ISE persona
- Successful
Along with Administration, other services (MNT,PROFILER,SESSION) are enabled on this node. Installing and running URT might consume additional resources.
Do you want to proceed with installing and running URT now (y/n):y
Checking if URT is recent(<45 days old)
- Note: URT is 553 days old and its version is 1.0.0. There might be a recent URT bundle on CCO, please verify on CCO
Do you want to proceed with this version which is 553 days old (y/n):y
Proceeding with this version of URT itself
Installing URT bundle
- Successful
########################################
# Running Upgrade Readiness Tool (URT) #
########################################
This tool will perform following tasks:
1. Clone config database
2. Copy upgrade files
3. Data upgrade on cloned database
4. Time estimate for upgrade
Clone config database
=====================
[####################--------------------] 50% Exporting data from ISE database ORA-24247: network access denied by access control list (ACL)
executing the acl_config
SQL*Plus: Release 19.0.0.0.0 - Production on Sat Apr 5 15:15:24 2025
Version 19.10.0.0.0
Copyright (c) 1982, 2020, Oracle. All rights reserved.
Connected to:
Oracle Database 19c Enterprise Edition Release 19.0.0.0.0 - Production
Version 19.10.0.0.0
PL/SQL procedure successfully completed.
Disconnected from Oracle Database 19c Enterprise Edition Release 19.0.0.0.0 - Production
Version 19.10.0.0.0
ise
Not executed the acl_config
GET_HOST_NAME is working fine
[########################################] 100% Successful
Copy upgrade files
==================
- N/A
Data upgrade on cloned database
===============================
Modifying upgrade scripts to run on cloned database
- Successful
/opt/CSCOcpm/upgrade/bin/upgdb_sanity.sh: line 67: warning: command substitution: ignored null byte in input
Running schema upgrade on cloned database
- Running db sanity to check and fix if any index corruption
- Auto Upgrading Schema for UPS Model
- Upgrading Schema completed for UPS Model
- Successful
Running sanity after schema upgrade on cloned database
- Successful
Running data upgrade on cloned database
- Data upgrade step 1/37, ProvisioningRegistrationNew(3.2.0.0)... Done in 13 seconds.
- Data upgrade step 2/37, NetworkAccessUpgrade(3.2.0.100)... Done in 1 seconds.
- Data upgrade step 3/37, PassiveIdAttributeRegistration(3.2.0.225)... Done in 0 seconds.
- Data upgrade step 4/37, RegisterPostureTypes(3.2.0.250)... Done in 0 seconds.
- Data upgrade step 5/37, FiveGUpgradeService(3.2.0.256)... Done in 5 seconds.
- Data upgrade step 6/37, EADictionaryCreation(3.2.0.300)... Done in 0 seconds.
- Data upgrade step 7/37, CdaRegistration(3.2.0.302)... Done in 0 seconds.
- Data upgrade step 8/37, GeneralMdmSettingsRegistration(3.2.0.308)... Done in 0 seconds.
- Data upgrade step 9/37, TelemetryUpgrade(3.2.0.311)... Done in 0 seconds.
- Data upgrade step 10/37, NSFUpgradeService(3.2.0.312)... Done in 5 seconds.
- Data upgrade step 11/37, GuestAccessUpgradeService(3.2.0.339)... Done in 0 seconds.
- Data upgrade step 12/37, RestIDStoreRegistration(3.2.0.464)... Done in 0 seconds.
- Data upgrade step 13/37, UPSUpgradeHandler(3.2.0.468)... Done in 6 seconds.
- Data upgrade step 14/37, AuthzPolicyDictionaryManager(3.3.0.108)... Done in 0 seconds.
- Data upgrade step 15/37, PIProfilerRegistrationService(3.3.0.140)... Done in 11 seconds.
- Data upgrade step 16/37, MfcDictionaryManager(3.3.0.188)... Done in 0 seconds.
- Data upgrade step 17/37, NSFUpgradeService(3.3.0.250)... Done in 0 seconds.
- Data upgrade step 18/37, IdentityProviderAddCertToTrustedListUpgrade(3.3.0.253)... Done in 0 seconds.
- Data upgrade step 19/37, PostureSessionOSArchRegistration(3.3.0.257)... Done in 0 seconds.
- Data upgrade step 20/37, ProfilerUpgradeService(3.3.0.286)... Done in 0 seconds.
- Data upgrade step 21/37, CertMgmtUpgradeService(3.3.0.295)... Done in 0 seconds.
- Data upgrade step 22/37, UPSUpgradeHandler(3.3.0.295)... Done in 5 seconds.
- Data upgrade step 23/37, PIProfilerRegistrationService(3.3.0.306)... Done in 0 seconds.
- Data upgrade step 24/37, CpmIpFilterUpgradeService(3.3.0.306)... Done in 0 seconds.
- Data upgrade step 25/37, NodeExporterPasswordHandler(3.3.0.356)... Done in 1 seconds.
- Data upgrade step 26/37, ProfilerUpgradeService(3.3.0.365)... Done in 0 seconds.
- Data upgrade step 27/37, PIProfilerRegistrationService(3.3.0.400)... Done in 0 seconds.
- Data upgrade step 28/37, LogAnalyticsEnableService(3.3.0.417)... Done in 2 seconds.
- Data upgrade step 29/37, NSFUpgradeService(3.3.0.430)... Done in 0 seconds.
- Data upgrade step 30/37, ProfilerUpgradeService(3.3.0.430)... Done in 0 seconds.
- Data upgrade step 31/37, GuestAccessUpgradeService(3.3.0.430)... Done in 12 seconds.
- Data upgrade step 32/37, UPSUpgradeHandler(3.3.0.430)... Done in 1 seconds.
- Data upgrade step 33/37, ESUpgradeService(3.3.0.430)... Done in 0 seconds.
- Data upgrade step 34/37, ProvisioningRegistrationNew(3.3.0.430)... Done in 8 seconds.
- Data upgrade step 35/37, NodeExporterPasswordHandler(3.3.0.430)... Done in 0 seconds.
- Data upgrade step 36/37, LogAnalyticsEnableService(3.3.0.430)... Done in 1 seconds.
- Data upgrade step 37/37, SecuritySettingsRegistration(3.3.0.464)... Done in 0 seconds.
- Successful
Running data upgrade for node specific data on cloned database
- Successful
Time estimate for upgrade
=========================
(Estimates are calculated based on size of config and mnt data only. Network latency between PAN and other nodes is not considered in calculating estimates)
Estimated time for each node (in mins):
MNT data is 14 GB, purging this data can reduce upgrade time
ise(STANDALONE):146
mnt.analytics.storage already exists in platform.properties
mnt.analytics.storage already exists in platform.properties-active
Final cleanup before exiting...
Application successfully installed
ise/admin#


Comments
Post a Comment